Some of you guys already have blog grab buttons and know how to make them, but I figured there were at least a few who wouldn't mind a tutorial and basic breakdown of the HTML code involved:

1. Make your button for free - you can crop or resize pictures on picnik.com and then, in 'create', you can add text. I don't make them any bigger than 150 pixels by 150 pixels. Picnik is how I make all mine, using pictures of my products or fabric.
2. Now, in Windows Start=>Accessories=>Notepad, copy and paste this:
<center><a href="Your Blog URL" target="_blank"><img src="Direct Link Reference from Photobucket" border="0" alt="Your Blog's Name" /></a><div> <div align="center"> <form><textarea rows="7" cols="15"><center><a href="Your Blog URL" target="_blank"><img src="Direct Link Reference from Photobucket" alt="Your Blog's Name" /></a></center></textarea></form> </div></div></center>
What you'll probably notice is that you have to plug nearly everything in TWICE - Once to display the button on your page, and again so that when someone copies it from the box below, they'll be getting an IDENTICAL copy of the code used for the button. So double check everything to make sure you've got it right!
What you'll probably notice is that you have to plug nearly everything in TWICE - Once to display the button on your page, and again so that when someone copies it from the box below, they'll be getting an IDENTICAL copy of the code used for the button. So double check everything to make sure you've got it right!
3. For the Direct Link: Now you need a 'reference' code. Go to photobucket (I love photobucket because it seems to be designed for people who aren't html wizards, so just go there, ok?) and add your picture (If you already have an account, you can send it over right from picnik's 'save and share' tab.). Now, click on your picture and there's a little box with 4 codes:
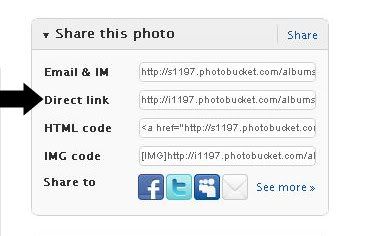
See that one labeled 'Direct Link'? Click that to copy it, then paste it where the purple words are in the code. Explanation: that <img src="..." thing tells the browser that for the image source, it needs to look at that http:// address - because Photobucket is acting as your "image source" hosting service (for free!). The /> (after "your blog name") closes the specific <a href="..." section, and the next one, </a> tells the browser that the <a> anchor reference is finished. / in HTML means "Hi, I'm finished now!" to the browser.
Don't worry too much about the </center> and <div> stuff right now. That stuff is telling the browser that the second bit of info needs to be displayed in a box.
Here's my code for my grab button:
<center><a href="http://www.sewhappygeek.blogspot.com" target="_blank"><img src="http://i1197.photobucket.com/albums/aa424/sewhappygeek/newbutton1.jpg" border="0" alt="Sew Happy Geek" /></a><div> <div align="center"> <form><textarea rows="7" cols="15">
<center><a href="http://www.sewhappygeek.blogspot.com" target="_blank"><img src="http://i1197.photobucket.com/albums/aa424/sewhappygeek/newbutton1.jpg" alt="SewHappyGeek" /></a></center></textarea></form> </div></div></center>
<center><a href="http://www.sewhappygeek.blogspot.com" target="_blank"><img src="http://i1197.photobucket.com/albums/aa424/sewhappygeek/newbutton1.jpg" alt="SewHappyGeek" /></a></center></textarea></form> </div></div></center>
4.-Demystification! Your Blog's Name, alt Explanation: alt="..." is where you put your blog's name in. That's for lots of reasons, including blind people who have their content read to them by the computer, so it can 'describe' that there's an image there, like an alternative to the picture in case the picture doesn't work (or can't be seen)...does that make sense?
<a href="..." Fuller (Geeky) Explanation: <a> in HTML means 'anchor' and you need to use this to create a link to another 'document', by using the href attribute (which tells the browser what link you want it to go to - in this case, your blog!). Must have " at beginning and end of web address. <a href="..." before a web address tells the browser which website address it should take you to when you click on it, so make sure the only <a href= you have in your code are the two with your address!!! If your code looks like this: <img src="<a href="http://i1197.photobucket.com/albums/aa424/sewhappygeek/newbutton1.jpg" you need to erase that <a href= part!
<textarea rows="7" cols="15"> (the stuff in yellow): tells the browser how big you want your nifty box to be - if you want it a bit smaller, try <textarea rows="7" cols="13"> or whatever, till you're happy.
Your URL - That's your blog address, which I bet you've already figured out, because you are totally getting the hang of this stuff.
To add Your Shiny New Button to your Blogger blog and take that button for a test drive (sorry, I don't have a wordpress blog?): Copy your whole button code. Go to your Dashboard => Design => Add a Gadget. Then scroll down to HTML/Javascript, click that, and paste your code in! Then hit 'Save' and 'View Blog'. Are you awesome or what?
If you can't figure it out or it goes wrong, email the whole html shebang to me:
And I'll try to figure it out! If you really like the logistics of things, you might try learning a bit of HTML yourself. You can start learning for free at W3 Schools which I totally recommend. And I also bought Head First HTML on Amazon too, but you know me, I never finish anyth...
Cheers and Good Luck!

© J C Excell, 2011
Thanks for this - I hope I'll get around to doing this soon.... have a great week. :-)
ReplyDeleteGreat tutorial Jenna! Thanks for all the time you put into learning and posting all that computer speak!!
ReplyDeleteThanks for taking the time to write this all out. Hope to get mine made later today! :)
ReplyDeleteLove my new button - thank you for making it so easy :D
ReplyDeleteThanks for the info. My DD made me the one I have now. Next time I won't have to ask for her help.
ReplyDeletethank you ! But actually i don't want a button. It looks so chaotic with al those buttons. But hey : everyone has to make it's own blog and happily they are not all the same ;)
ReplyDeleteGreat weekend !
I just wanted to thank you so much for taking the time to explain all of this to us! I have been looking into doing this for weeks and nobody explained it to where I could understand. The colored wording is what did it for me so I knew what went where. Thank you again I'm so excited it is finally complete! God bless, Jennifer
ReplyDelete