And don't forget to sign up for the Awesome Giveaway!, plus you can still add your creations to the linky party!

Sheesh. Get on with it, will ya, Jen?
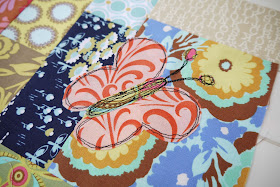
Here's my first mug rug, in all its tiny quilty glory:
Here's the back:
Hardware: Scraps of fabric - I used 10 fabrics in all, including the binding and butterfly.
Heat & Bond Lite (a smallish scrap for the butterfly)
Batting/Wadding: 9" x 11" (p.s. if you live in the UK and want some batting scraps, email me and I'll post some out to you:
Binding needs to be at least 42" long - I used 48" to have plenty to screw up with.
Ok, here's how the front/top breaks down, measurement wise:
And I made the back about .5" or so bigger on each side. You can use any fabrics you want, in any measurements - don't let mine limit you!
And remember, you don't have to make/piece them like I did! I just happened to have small bits of stuff lying around so I used it - you can do the whole thing in 3" strips if you like - you'd need about 6 strips, all 3" x 11.5". You can make it a bit larger or smaller than my finished size of 8.5" by 10.5". If you're having trouble, email me:
So that's the top I had planned, but I had actually made mine too short (the measurements in the pic aren't the exact measurements I used - live and learn, right?). So I added a little strip to the bottom:
So, gather your strips and sew them together using a 1/4" seam allowance - you can use bigger but you don't need to, so why waste the fabric? Once you have them all together, trim the edges:
OPTIONAL: The butterfly- Confession: I am a TERRIBLE artist - I can't even draw a circle without screwing it up. But I did draw these, and they don't look too bad (says me):
So draw the wings and body (above) onto the paper side of your Heat & Bond Lite, then iron onto THE BACK of your chosen fabric. Play with the placement of your butterfly on your mug rug until you're happy, then iron the wings on first, followed by the body. You can also choose to make 2 tiny circles for the antennae ends.
I used black cotton thread and a free motion embroidery foot to go round everything twice or more, plus made the antennae and went round the tiny circles. It's not as hard as it looks, I promise! You can go really slow if you're nervous :)
Make your sandwich:
I love 505 basting spray! if you don't have any, it's ok, just use safety pins to keep the 3 layers all together. (And don't sew over them!)
On a hard surface, place your rug back Right Side Down, then place the batting on top. Then place the rug top on the batting, with it facing up. Smooth it all out so there are no wrinkles or puckers. Like this:
Now quilt that baby any way you like! If you get stuck and can't figure out what quilting design to use, email me with a pic and I'll try to help:
I did mine in a tight wandering stipple:
Now you just need to trim it and bind it!
Here are some great binding tutorials:
- Heather Bailey pdf
- Jaybird Quilts Binding Tutorial - Julie is a lovely lady and her tutorials are really useful!!
- Red Pepper Quilts binding tutorial - this is the tutorial I usually use myself
Yay! You rock! And I'll be back next week with another mug rug tutorial, this time (I hope) with a downloadable template for the applique!

© Copyright J C Excell, 2011
All rights reserved


This is great, so pretty!
ReplyDeleteBee happy x
Have a delicious day!
Super sweet mug rug! I love doing that scribbly stitching to secure appliqués! Happy Fabric Tuesday!
ReplyDeleteThat's really cute! I've only attempted quilting one time, and it didnt turn out super great!
ReplyDeleteVisiting from Tea Rose Home!~
THat is very cute! Visiting from The Tea Room.
ReplyDelete~ Kimberlee at The Spunky Diva
{Check out how I made my name 'clickable'.}
i love these colors!!
ReplyDeleteyour mug rug is absolutely great! Thanks for sharing, I really want to try this one. and your butterfly is great too!
ReplyDeleteSo fun! I love the fabric choice on your mug rug...so perfect!
ReplyDeleteI just found your blog via comments on V and Co. I always like finding new UK quilty-crafty blogs, so though I'd say hi! :-)
ReplyDeleteThanks I've become stuck on fabric postcards, I think I'll try this next.
ReplyDelete:)
That is so cute!! Thanks so much for sharing how to do it, so great! Thanks for linking to Fabric Tuesday :)
ReplyDeleteAm I too late for the mug rug swap? Just finding you now...
ReplyDeleteThat is really really cute! I'm loving it! Thanks so much for linking it up :D
ReplyDelete